
Building a fortress in Minecraft isn’t just about stacking blocks, it’s about creating a stronghold that screams power, withstands sieges, and serves as your ultimate base of operations. Whether you’re defending against Creeper invasions in Survival mode or crafting an architectural masterpiece in Creative, a well-designed fortress combines form, function, and a healthy dose of intimidation.
In 2026, fortress building has evolved beyond basic stone walls. Players are incorporating redstone automation, aesthetic detailing, and strategic positioning that would make medieval architects jealous. This guide breaks down everything from choosing the perfect location to installing defense systems that’ll make hostile mobs think twice. Let’s build something legendary.
Table of Contents
ToggleKey Takeaways
- A Minecraft fortress prioritizes security with thick walls (3-4+ blocks), defensive structures like towers, and mob-proof lighting to protect resources and serve as your ultimate operational base.
- Location is critical—choose terrain with high ground advantages (mountains, cliffs) near essential resources like stone, wood, iron, and water sources to minimize resource-gathering time.
- Proper mob-proofing requires consistent lighting (torches every 12 blocks), secure iron doors with pressure plate systems, and 3-block-thick walls to withstand Creeper blasts and prevent mob entry.
- Incorporate functional interior spaces including storage rooms, enchanting areas, farms, and hidden escape tunnels to transform your fortress from a defensive shell into a complete sustainable base.
- Avoid common mistakes like single entry points, insufficient lighting, thin walls, and overcomplicating redstone systems—start with scalable designs and test your defenses before relying on them.
- Balance defense with aesthetics by using varied block textures, adding architectural details like buttresses and crenellations, and integrating redstone automation for farms and security systems.
What Is a Minecraft Fortress?
A Minecraft fortress is a heavily fortified structure designed to protect players, resources, and infrastructure from hostile threats. Unlike basic shelters or houses, fortresses prioritize defensive features: thick walls, elevated positions, controlled entry points, and often integrated trap systems.
Fortresses can range from compact bunkers carved into mountainsides to sprawling castle complexes with multiple towers and courtyards. The defining characteristics are always the same: security first, with aesthetics and functionality following close behind.
What separates a fortress from other builds is intent. A cottage might keep you safe from zombies, but a fortress is built to dominate the landscape. It’s a statement. It’s where you store your diamond blocks, brew your potions, and plan your next Nether expedition without worrying about a Phantom ruining your night.
In practical terms, fortresses typically include perimeter walls at least 3-4 blocks high, dedicated defensive structures like towers or battlements, mob-proof lighting systems, and multiple fallback positions. They’re built to last through sieges, both from mobs and other players in multiplayer servers.
Types of Fortresses You Can Build
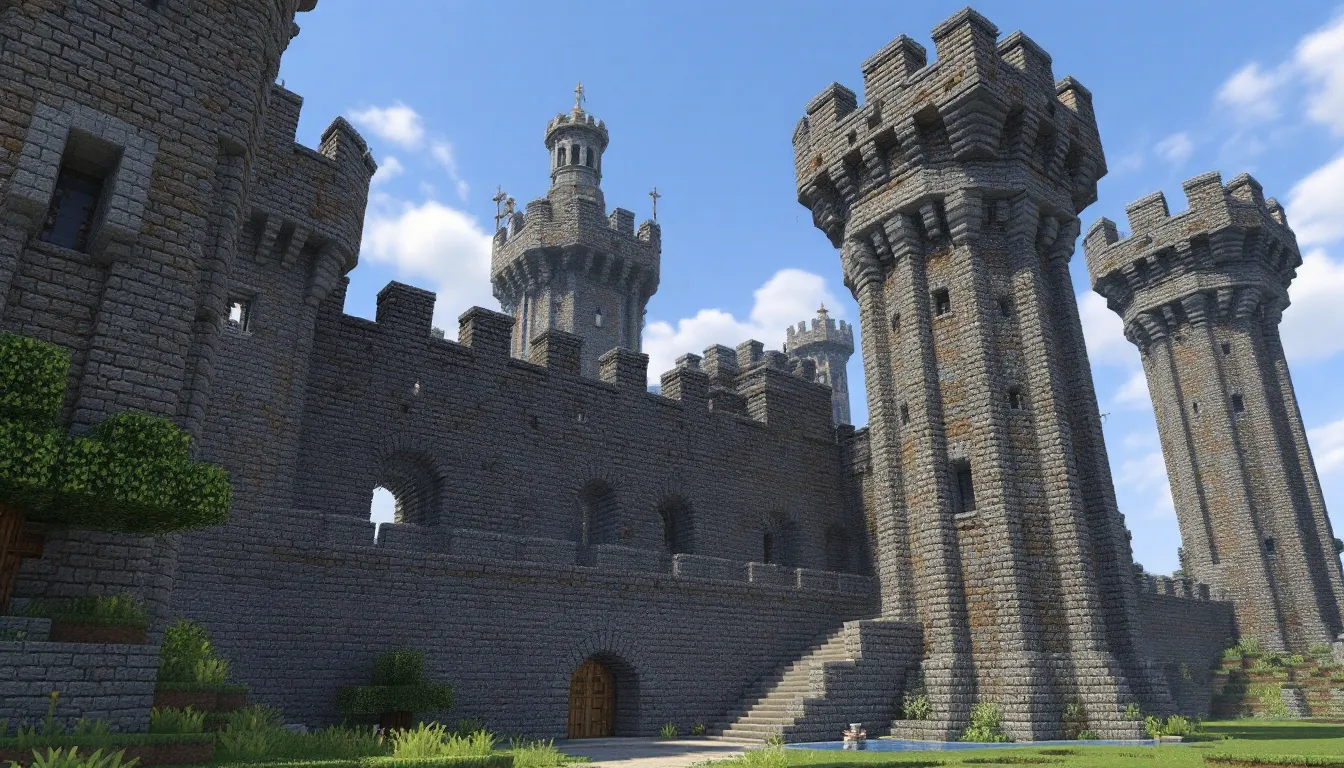
Medieval Castle Fortresses
Medieval castles remain the gold standard for Minecraft fortress builds. They typically feature stone brick or cobblestone construction, corner towers, a central keep, and imposing gates.
Key elements include:
- Curtain walls with crenellations (the classic notched battlements)
- Gatehouse with iron doors or fence gates
- Corner towers for elevation advantage and archer positions
- Inner bailey for farming, storage, and living quarters
- Moat (optional but intimidating)
Medieval designs work brilliantly in plains, forest, or mountain biomes. They’re resource-intensive but deliver that classic fortress vibe. If you’re looking for a structured approach, some players find success with simple castle layouts that prioritize functionality without sacrificing grandeur.
Underground Bunker Fortresses
Underground bunkers trade visibility for invisibility. These fortresses are carved into hillsides or excavated beneath the surface, making them nearly impossible to spot from a distance.
Advantages:
- Natural camouflage (especially in multiplayer/PvP servers)
- Temperature regulation (okay, not really, but it feels right)
- Stone and ore accessibility during construction
- Protection from aerial threats (Phantoms, other players with Elytra)
The challenge? Lighting becomes critical. Every dark corner is a potential spawn point, so you’ll burn through torches fast. Ventilation shafts disguised as natural terrain features help with aesthetics while providing emergency exits.
Sky Fortresses and Floating Islands
Sky fortresses are built at or above cloud level (Y-level 128+), often on custom-built floating islands. They’re the ultimate flex in Creative mode and a genuine engineering challenge in Survival.
Benefits include:
- Zero ground-level mob threats
- Unobstructed 360-degree views
- Dramatic aesthetic impact
- Easy Elytra access for quick departures
Downsides? Resource transportation is a nightmare in Survival. You’ll need scaffolding, water elevators, or soul sand bubble columns to ferry materials skyward. One misstep and you’re cratering. Always pack a Water Bucket.
Nether and End Dimension Fortresses
Building in alternate dimensions adds unique challenges and opportunities. The Nether already contains naturally generated Nether fortresses, massive structures made of Nether brick that spawn Blazes and Wither Skeletons. Players often renovate these existing minecraft nether fortress structures, reinforcing them with blast-resistant materials like Blackstone or adding custom wings.
In the End, fortresses are typically built on outer islands post-Dragon fight. Purpur blocks and End stone create an otherworldly aesthetic. These dimensional outposts serve as staging areas for Shulker farming or End city raids.
Key considerations for dimensional builds:
- Use fire-resistant materials in the Nether (Ghast fireballs are real)
- Account for limited block variety
- Plan escape routes carefully (death in these dimensions is expensive)
Choosing the Perfect Location for Your Fortress
Terrain Considerations and Strategic Advantages
Location determines everything. A fortress on a mountain peak offers visibility and natural defenses but complicates resource access. A plains fortress is easy to build but lacks terrain advantages.
High ground is king for defensive builds. Elevated positions force attackers upward, giving defenders time to react. Mountains, cliffs, or large hills provide natural walls on one or more sides, cutting construction requirements.
Islands (ocean or lava lake) create natural moats. Single-bridge access points are easy to defend or destroy in emergencies. Just ensure you have backup escape routes, getting trapped on your own island by a Creeper explosion is embarrassing.
Biome selection matters more than you’d think:
- Plains/Savanna: Easy building, high visibility, zero terrain bonuses
- Mountains/Extreme Hills: Natural defenses, scenic views, difficult resource transport
- Forest: Abundant wood, camouflage potential, reduced sightlines
- Desert/Badlands: Clear approaches, sandstone aesthetics, limited resources
- Swamp: Slime farming potential, atmospheric, increased mob spawns
Avoid building in Deep Dark biomes unless you enjoy Warden jumpscares. Similarly, Mushroom Islands eliminate hostile mob spawns entirely, great for peaceful builds, but where’s the fun in that?
Resource Accessibility and Proximity
Your fortress needs supplies, and hauling materials across 2,000 blocks gets old fast. Prioritize locations near:
Essential resources:
- Stone deposits (for cobblestone, stone brick)
- Wood (multiple tree types for variety)
- Iron veins (doors, hoppers, rails)
- Coal or alternative fuel sources
Water sources are non-negotiable. You’ll need farms, brewing stands, and probably decorative fountains. A nearby river or lake saves time.
Village proximity offers trading opportunities, but be prepared to defend villagers from raids. If you’re triggering Bad Omen effects regularly, expect your fortress to become raid central.
Nether portal placement deserves special attention. Position your portal inside the fortress walls, never outside. You don’t want mobs using your fast-travel network. Experienced builders maintain detailed fortress defense guides that emphasize secured portal rooms as priority one.
Essential Materials and Resources
Best Building Blocks for Fortress Construction
Block choice affects both aesthetics and blast resistance. Stone variants dominate fortress construction for good reason:
Primary structural blocks:
- Stone Bricks: Classic fortress aesthetic, 6.0 blast resistance, widely available
- Cobblestone: Ugly but functional, 6.0 blast resistance, infinite via generators
- Deepslate variants: Darker appearance, same defensive stats, mining-intensive
- Blackstone: Nether aesthetic, 6.0 blast resistance, great for dimensional builds
- Obsidian: 1,200 blast resistance (Wither-proof), time-consuming to mine
Accent and detail blocks:
- Andesite/Diorite/Granite (polished or raw for texture variation)
- Dark Oak/Spruce Logs (structural beams, gates)
- Iron Bars (windows, prison cells)
- Glass/Stained Glass (visibility with protection)
Roofing materials:
- Stone/Brick Slabs and Stairs (classic castle roofs)
- Dark Oak/Spruce Planks (timber roofing)
- Nether Brick Slabs (darker, fire-resistant option)
Avoid wood-heavy designs unless you’re confident in your fire prevention. A single Blaze or lava bucket accident can torch weeks of work.
Gathering Tools and Preparation
Before breaking ground, stock up:
Essential tools (Survival mode):
- Diamond or Netherite Pickaxes (plural, you’ll break several)
- Efficiency V enchantment (speeds stone gathering by 5x)
- Silk Touch pickaxe (for collecting stone instead of cobblestone)
- Fortune III pickaxe (maximizing coal, redstone, lapis drops)
- Multiple axes (wood harvesting)
- Shears (collecting vines, leaves for decoration)
Quality-of-life items:
- Shulker Boxes (portable storage for construction materials)
- Ender Chest (safe inventory overflow)
- Scaffolding stacks (vertical building aid)
- Water Buckets (emergency fall protection, infinite water source)
- Food supply (golden carrots or steak)
Quantity estimates for medium fortress (30×30 footprint, 15 blocks tall):
- Stone bricks: ~8,000-12,000 blocks
- Wood planks: ~1,500-3,000 blocks
- Glass: ~200-500 blocks
- Torches: ~500-800
- Iron (doors, bars, hoppers): 5-10 stacks of ingots
Double those numbers for larger builds. It’s better to over-gather than make constant resource runs mid-construction.
Step-by-Step Fortress Construction Guide
Planning Your Foundation and Layout
Even Creative mode builders benefit from planning. Start with a mental or physical blueprint:
- Mark corners with temporary blocks (dirt or wool)
- Define perimeter walls (minimum 3 blocks thick for structural integrity)
- Locate towers (corners and midpoints for larger fortresses)
- Plan entry points (main gate plus 1-2 hidden exits)
- Zone interior space (storage, living quarters, farms, enchanting room)
Foundation depth depends on terrain. On flat ground, dig 2-3 blocks down and fill with stone for stability. On hills or mountains, you might be building outward from solid rock, no foundation needed.
Pro tip: Use graph paper or planning tools for complex designs. Many builders maintain notebooks with fortress schematics. Others use creative test worlds to prototype sections before committing resources in Survival.
Building Walls, Towers, and Battlements
Wall construction sequence:
- Build perimeter to full height (12-20 blocks recommended)
- Add thickness (3-block-thick walls resist Creeper blasts)
- Install battlements (1-block-tall crenellations every 2 blocks)
- Create walkways (interior ledge 2-3 blocks below wall top)
Tower placement breaks up wall monotony and adds function:
- Corner towers: Essential for coverage, typically 3-5 blocks taller than walls
- Gatehouse towers: Flank the main entrance, house door mechanisms
- Mid-wall towers: For long wall sections (40+ blocks)
Towers should project 2-3 blocks outward from walls, creating defensive angles. Windows or arrow slits at multiple levels provide firing positions.
Battlements aren’t just decorative. The gaps allow:
- Bow shots at approaching mobs
- Potion tosses
- Visibility while minimizing exposure
Alternate solid and gap blocks across the wall top. Add slabs on the walkway for spawn-proofing without torches everywhere.
Creating Interior Rooms and Functional Spaces
An empty fortress is just expensive walls. Functional interiors include:
Ground floor:
- Entry hall with secure door system
- Armory (chests for weapons, armor, shields)
- Storage rooms (organized by material type)
- Stable or mount area (horses, pigs with saddles)
Upper floors:
- Living quarters (bed, crafting station, basic chests)
- Enchanting room (requires 15 bookshelves, quiet corner)
- Brewing lab (water source, Nether wart farm, storage)
- Map room (item frames with completed maps)
Basement/Underground:
- Vault (valuables behind obsidian or hidden doors)
- Mob farm (if integrated into fortress design)
- Escape tunnel (exits outside walls, concealed entrance)
Farms within walls:
- Crop farm (wheat, carrots, potatoes)
- Animal pens (separated by species)
- Tree farm (compact, often roofed)
Some players reference comprehensive building tutorials when planning complex interior layouts, especially for redstone-heavy rooms.
Connect floors with staircases (safer) or ladders (space-efficient). Water elevators using soul sand provide fast vertical transport but require more construction.
Defensive Features and Security Systems
Mob-Proofing Your Fortress
Lighting is your first defense. Hostile mobs spawn in light level 0 (complete darkness in Java Edition 1.18+). Prevent this by:
- Torches every 12 blocks (minimum coverage)
- Lanterns or glowstone for higher-tier aesthetics
- Sea lanterns in water features
- Jack o’lanterns hidden in floors/walls (directional, easy to conceal)
Don’t just light interiors, illuminate the perimeter exterior to push spawn points away from walls. A 20-block lit buffer zone significantly reduces wall-side mob clustering.
Entry point security:
- Iron doors (can’t be opened by zombies, even on Hard difficulty)
- Fence gates (mobs won’t path through, but skeletons can shoot over)
- Double-door airlocks (prevents mob slip-ins during entry)
- Pressure plate inside, button outside (you can exit easily, mobs can’t trigger entry)
Wall gaps and vulnerabilities:
- Spiders climb walls, add overhangs (outward-facing blocks) at wall tops
- Endermen teleport, 3-block-high ceilings max or waterlog areas
- Pillager patrols spawn in certain biomes, regular perimeter sweeps
Moat considerations:
- Water moats slow mobs, drown zombies (but not all undead)
- Lava moats kill most mobs instantly but create visibility issues and fire risk
- Dry moats (3+ blocks deep) prevent mob approach but require jumping or bridging to cross
Redstone Traps and Defense Mechanisms
Redstone transforms fortresses from passive to active defense:
Entry traps:
- Piston crushers: Pistons push blocks into mob pathways, suffocating them
- Lava dispensers: Button-activated lava curtains at gates
- Arrow dispensers: Rapid-fire arrow traps triggered by pressure plates
- TNT traps: Nuclear option for desperate times (damages your fortress too)
Detection systems:
- Tripwire hooks across approach paths (trigger alarms or traps)
- Pressure plates hidden under carpet (decorative and functional)
- Observers watching for block updates (advanced players only)
Drawbridge mechanics:
- Sticky pistons retract bridge blocks on command
- Fence gate arrays open/close with single lever
- Minecart systems for rapid wall breaches (escape route)
Keep redstone systems simple. Overly complex contraptions break, lag multiplayer servers, and confuse you when you return after months away.
Lighting and Spawn Prevention Strategies
Beyond basic torches, advanced lighting includes:
Hidden lighting:
- Glowstone under carpets (light passes through)
- Jack o’lanterns in walls (face them inward, cover with trapdoors)
- Sea lanterns underwater (decorative ponds/moats)
Redstone lamps:
- Controlled by daylight sensors (auto night-lighting)
- Lever-activated (rooms you don’t always need lit)
- Aesthetic flexibility (can be switched off when not needed)
Spawn-proofing non-living areas:
- Slabs (bottom half blocks don’t allow spawns)
- Carpets (thin enough to prevent spawns)
- Buttons/pressure plates (decorative spawn prevention)
- Glass/leaves (transparent blocks, no spawns)
For roofs and battlements, use slabs or stairs instead of full blocks. This prevents mob spawns on your own fortress while maintaining the silhouette.
Advanced Fortress Design Tips and Tricks
Incorporating Redstone Automation
Automation elevates fortresses from static to smart:
Auto-farms inside walls:
- Crop farms: Observer-based or villager-automated
- Animal cookers: Automated breeding and cooking (chickens work best)
- Kelp/Bamboo farms: Renewable fuel source
Storage systems:
- Item sorters: Hopper chains auto-organize drops into labeled chests
- Overflow protection: Excess items route to designated disposal/storage
- Shulker box loaders: Quick inventory management for expeditions
Security automation:
- Auto-closing doors: Pressure plate entry, delayed piston closure
- Perimeter alarms: Note blocks or bells triggered by mob detection
- Automatic arrow refills: Droppers feeding dispenser traps
Lighting control:
- Daylight sensors: Turn on/off perimeter lights at dusk/dawn
- Master switches: Single lever controls all fortress lighting zones
Redstone adds complexity but pays dividends in convenience. Start small, automate one farm or door system, then expand as you gain confidence.
Aesthetic Enhancements and Decorative Elements
Function-first doesn’t mean ugly:
Texture variation:
- Mix stone brick variants (normal, mossy, cracked, chiseled)
- Add andesite or diorite bands for visual breaks
- Use stairs and slabs to create depth and shadow
Architectural details:
- Buttresses: Vertical pillar supports projecting from walls
- Machicolations: Overhangs with gaps (historically for dropping boiling oil)
- Crenellations with varied patterns: Not just simple up-down, add merlons (solid sections) of different widths
- Window frames: Stone brick stairs/slabs around glass panels
Decorative blocks:
- Banners: Custom designs for your faction/kingdom
- Armor stands: Guards at gates or in halls
- Item frames: Weapons, shields, maps displayed
- Paintings: Large medieval-style art for interior walls
- Plants: Vines on exterior for weathered look, potted flowers inside
Landscaping:
- Courtyards: Central grass/stone areas with fountains or statues
- Gardens: Flower beds, hedge mazes using leaf blocks
- Pathways: Stone brick paths leading to entrance
- Statues: Custom sculptures of players, mobs, or abstract designs
Don’t underestimate the power of asymmetry. Perfectly symmetrical fortresses look artificial. Add an extra tower here, extend one wall there, imperfections create character.
Survival vs. Creative Mode Fortress Building
Survival mode fortress building is an achievement. Every block is mined, every resource hauled, every design decision weighed against material costs.
Advantages:
- Genuine sense of accomplishment
- Resource management skills improve
- Fortress becomes a true base, not just a showpiece
- Multiplayer bragging rights (“I built this without creative”)
Challenges:
- Time-intensive (expect 20-100+ hours for large fortresses)
- Resource gathering can feel grindy
- Mob interruptions during construction
- Higher stakes (death means lost items, spawn risks)
Survival building tips:
- Build in stages (walls first, interior later)
- Set up temporary shelter inside construction zone
- Use beacon buffs (Haste II speeds mining/building significantly)
- Keep Ender Chest stocked with emergency supplies
- Work during in-game day when possible (fewer mob distractions)
Creative mode removes resource limits and danger, letting you focus purely on design.
Advantages:
- Unlimited materials (experiment freely)
- Flight (build vertically without scaffolding)
- No mob threats (uninterrupted work sessions)
- Faster iteration (test designs, make changes instantly)
Challenges:
- Less rewarding emotionally (some players)
- Easy to over-scope (builds balloon to unfinishable sizes)
- No survival integration (fortress is purely aesthetic)
Creative building tips:
- Set self-imposed limits (“only use blocks I could realistically gather”)
- Build to scale (measure against Survival resource availability)
- Use structure blocks to save/copy sections
- Test in Survival (switch modes to verify functionality)
Many builders prototype in Creative, execute in Survival. Design the fortress, calculate materials, then gather and build for real. Best of both worlds.
For multiplayer servers, Creative access is usually restricted. Plan accordingly and accept that Survival collaboration might mean months-long projects. That’s part of the appeal.
Common Mistakes to Avoid When Building Fortresses
Mistake #1: Insufficient lighting. Dark corners spawn mobs inside your fortress. Players find hostile mobs in their “secure” storage rooms because they missed three blocks of darkness behind a staircase. Light everything.
Mistake #2: Single entry point with no backup. A Creeper explodes your only door, and now you’re trapped inside (or locked out). Always include at least one hidden exit, a tunnel, underwater passage, or disguised door.
Mistake #3: Thin walls. Single-block-thick walls look fine until a Creeper detonates and opens a mob highway into your interior. Minimum 2 blocks, ideally 3 for blast resistance.
Mistake #4: Flat, featureless walls. Visually boring and functionally weak. Add depth with buttresses, varied materials, windows, or terrain integration. Flat walls scream “beginner build.”
Mistake #5: Ignoring the roof. Open-top fortresses invite Phantom attacks, rain, and roof-spawned mobs dropping into your courtyard. Roof everything or accept the consequences.
Mistake #6: Building too large in Survival. Ambition is great, but a 200×200 fortress in Survival without planning leads to burnout. Start smaller, expand later. Many guides from experienced builders at gaming resource sites emphasize scalable designs that grow with your resource base.
Mistake #7: Poor storage organization. You build this massive fortress, then toss everything into random chests. Label chests with item frames or signs. Future-you will be grateful.
Mistake #8: No mob-proofing the perimeter. Mobs clustering at your walls make noise, attract more mobs, and create danger every time you exit. Light and clear the area 20+ blocks out.
Mistake #9: Forgetting farms inside walls. Running outside for food/wood defeats the purpose of a fortress. Include basic sustainability: crop farm, tree farm, animal pens.
Mistake #10: Not testing defenses. You install traps and security but never verify they work. Switch to Survival, spawn mobs (or wait for nightfall), and see what gets through. Adjust accordingly.
Mistake #11: Overcomplicating redstone. Elaborate trap systems break. Keep it simple: pressure plate triggers dispenser. That’s reliable. Twelve-stage contraptions with repeaters and comparators will fail at 2am when you need them most.
Mistake #12: Building in unsurvivable locations without preparation. Desert fortress with no water source nearby? Mountain fortress with no wood? You’ll spend more time traveling for resources than building. Location matters.
Conclusion
A fortress in Minecraft is more than a build, it’s a statement of intent. It’s where you store your hard-won gear, plan your next adventure, and stand against whatever the game throws at you. Whether you’re constructing a medieval castle on a plains biome, carving a hidden bunker into a mountainside, or renovating a naturally spawned minecraft nether fortress, the principles remain the same: strong walls, smart design, and attention to detail.
The best fortresses balance defense and aesthetics, function and flair. They evolve over time, starting as simple stone boxes and growing into multi-level complexes with farms, automation, and personality. Don’t get paralyzed by perfectionism, start building, learn from mistakes, and iterate.
Grab your pickaxe, mark those corners, and start laying foundation blocks. Your stronghold awaits.